Changing ESXi Hostname on an EVO:RAIL Appliance
• 0 Comments • EVO:RAIL
The other day I did a VSPEX Blue (EMC’s flavor of EVO:RAIL Appliance) install for a customer that couldn’t conform to the hostname standards set forth by the EVO:RAIL Installation Wizard. After a little bit of digging and work I was able to change the hostnames and get everything working like it came from the factory. You simply cannot just change the ESXi hostname, you also need to modify EVO:RAIL Manager so things like health reporting actually function.
So, how do we do this?
First a quick warning… no guarantees :) this worked for me and my customer and has been reported in a couple KB articles but due to the nature of EVO:RAIL you may want to open a ticket with your OEM Vendor for help on doing this.
It’s important to note two things… 1) if you’re building out a new EVO:RAIL Appliance and know you need to use custom hostnames, avoid putting in a DNS Server entry during installation – this will force the unit to use a local dnsmasq service for name resolution and will make it easier for us to modify the hostnames. and 2) you should only place a single ESXi host into maintenance mode/change hostname at a time, this is important in allowing workloads to stay online.
And now on to the steps…
1.) On the vCenter Server Appliance modify the dnsmasq add-on file, by using vi /var/lib/vmware-marvin/dnsmasq/hosts – modify this file to reflect the new hostname(s)
2.) Place the first ESXi host into maintenance mode, then remove it from the vCenter inventory
3.) Add new hostname(s) to the local file on the vCenter Server Appliance, by using vi /etc/hosts – This is a temporary change to avoid any inconsistencies, we will remove these later
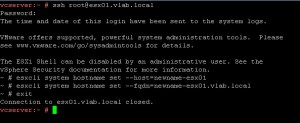
4.) Perform ESXi hostname change, I found the easiest way to do this was via esxcli by SSH’ing directly to the host
5.) Add new hostname to vCenter Server through vSphere (Web) Client, and exit Maintenance Mode
6.) Go to Step #2 for any additional ESXi hosts you’d like to change
7.) Restart the dnsmasq service on the vCenter Server Appliance; /etc/init.d/vmware-dnsmasq restart
8.) Clean up the /etc/hosts file by removing the changes you made in Step #3
That should be it for the changing of the ESXi hostname. However, you may notice now that the Health tab in EVO:RAIL Manager isn’t looking too happy.
This is because of two things, obviously 1) the hostname change but also 2) the morefId changed which breaks the connection between EVO:RAIL Manager and vCenter.
So, let’s go fix EVO:RAIL Manager.
1.) On the vCenter Server Appliance we’ll need to first determine the new morefId of the ESXi host(s). SSH into the vCenter Server Appliance and run the following command; sudo /opt/vmware/vpostgres/9.0/bin/psql -d VCDB vc -c”select id, dns_name from VPX_HOST;”
As you can see, our newname-esx01.vlab.local host has a new morefId of 26.
2.) Change the morefId and hostname by running vi /var/lib/vmware-marvin/hosts.json – change the morefId and hostname for the host(s) you’d like to modify
3.) Restart the EVO:RAIL Manager process with /etc/init.d/vmware-marvin restart
4.) Check EVO:RAIL Manager Health and all should be good!
It’s as easy as that. So, if your organization has a specific hostname requirement that cannot be met by the EVO:Rail Installation Wizard, have no fear… you can always modify after the build if needed!
Say you did an install without specifying a corporate DNS server, and you’d like to go back and add one after the fact all you need to do is add an entry into the /etc/dnsmasq.conf file. You can even add multiples.
_server=IP.ADDRESS.OF.DNS.SERVER
server=IP.ADDRESS.OF.2ND.DNS.SERVER _
Then you need to restart the dnsmasq service, /etc/init.d/vmware-dnsmasq restart
There you go, much better :)


